Review: QuadLock for Galaxy S8+

You might know I’ve made my own smartphone mount out of some plastic, but that idea became boring and more and more a pain to use than being handy.

It was time for a new mount that is safe, easy to remove, and good looking too.

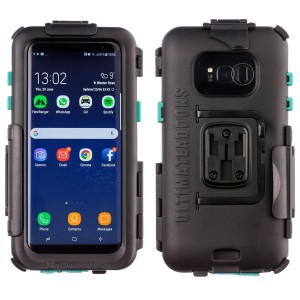
I searched online for different mounting systems, but the RAM X-grip can get loose and it still is a two-hand operation, just like the UltimateAddons waterproof case, that is not usable with phones with a case. (see below)

1_1_1
UltimateAddons waterproof case

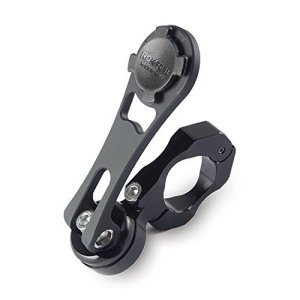
Then we have the Rokform mounting system with integrated case, which uses a similar interlocking mechanism as the Quadlock, but relies on some neodymium magnets to keep the phone secure on the mount. The Rokform is also not safe in landscape mode.

417pDHCzR2L
Rokform mount for handlebars

And alas, we have the Lifeproof mount. This one also relies on a magnet, but has a little tab that can be flipped to lock the phone in place. However, the design looks too flimsy and there is no way to attach the Lifeproof mount to a RAM ball without vibrations.

lpla-qms-bikemount-20
Lifeproof mount for handlebars

The one that caught my eye in the past few days was the Quadlock, because it has an ad running on Instagram (good lord, ads work on social media!) The design is good, it has a physical lock with audible feedback, it can be used in landscape AND portrait, and it doesn’t cost the world!
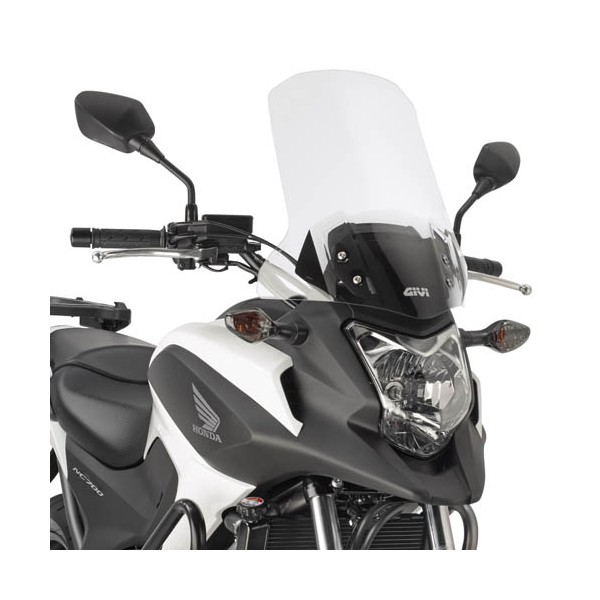
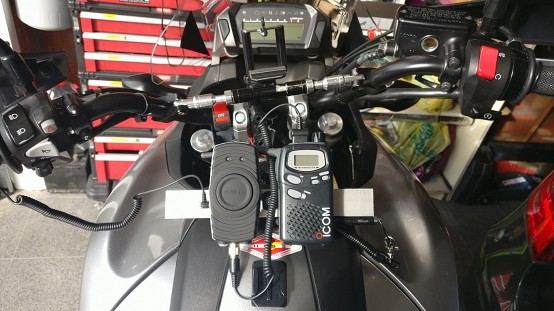
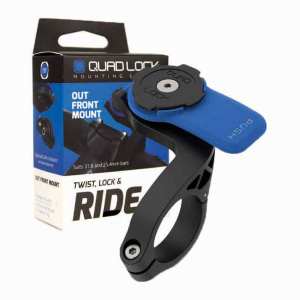
The photo shows a handlebar mount, but there is also a RAM, mirror, bike stem, car, sports armband, wall, belt and tripod adaptor mount available.

quad-lock-out-front-mount
The Quad Lock has a locking system

The case & mount together cost around 54€, and that is with the 10% discount on their site (quadlockcase.eu) by registering! The only downside is that they only accept creditcard or PayPal, so for the people that use Maestro or iDeal, tough luck.

The only downside on this mount, is that it is mainly made from composite material instead of aluminium. I hope the longevity of the mount will outlast my phone.

The case is made of a composite material of TPU and Polycarbonate, which makes it flexible, but also very strong. It has a microfiber lining to protect the glass back of the phone, and best of all, it is also compatible with wireless charging, although it took a few tries to get it charging.

For non-Apple or Samsung users, there exists a universal adaptor for your phone or phone case, which uses a 3M™ VHB adhesive. However, it will not adhere to rubber, silicone, TPU or soft touch coatings.

product
Quad Lock Adaptor Sticker

The mount fits securely in on the bike using the RAM arm, but it vibrates a bit because of my fake RAM ball mount from AliExpress, so results may vary with the quality of the parts you are using.

The verdict?
The Quad Lock mount and case is a very handy solution for iPhones, Samsung’s Galaxy phones and it also sports a universal mounting system.

If you already have RAM X-Grip on your bike and you want to upgrade it to a more secure and easier mount, the Quad Lock is perfect because it is just plug and play. No special tools needed to mount it to your bike.

If you want to mount your phone directly to your handelbars or mirror, you can get a full kit on quadlockcase.eu for €69.90 without 10% discount. The universal one costs around €54,90 without 10% discount.

So the price is on par with the UltimateAddons kit, above the LifeProof mount, and lower than the RAM and RokForm kit, whereas the latter costs 99.99USD for the mount itself.

All in all: Good price/quality ratio, good enough design, good protection and very easy to use!

Comparison: Givi D1111ST vs Honda Tall Windshield for Honda NC700X-750X

Now that I have multiple windshields for the NC700X I thought I would write a comparison between the two and see which one is the better one if you’re on a tight budget.

To begin with: I got the Givi D1111ST for free on my bike, and bought the Honda tall OEM windshield a week ago. “Why?” you might ask, is because the Givi D1111ST had a crack at one of the bolt holes, which I then proceeded to close up with superglue. That worked for a while, but then it cracked again.

Here’s a comparison by specifications:

Givi D1111STgivi-high-protection-windshield-16cm Honda Tall windscreen kithonda-touring-screen
Price (€) 81,65 (cheapest on RAD.EU) 149,00 (I bought mine for 79,71 at NC700shop.com)
Material Acrylic Polycarbonate
Height 49,5 cm 49,5 cm
Mounting Stock windscreen holes Aluminium rack
Looks Sporty, clean, black bottom Aggressive, rugged, clear bottom
Wind Protection Chest height Chest height

As you can see by the table, the height is the same, and the price difference is also noticable. I got my tall windshield cheaper at www.NC700shop.com but the original price is about 171€ (including shipping costs of 22€) which is a price difference from 89,35€.
For the price of 1 Honda tall windscreen, you can buy 2 Givi D1111ST windshields so to speak.

Both windschields work with the Givi HP1111 handprotectors.

Both have their problems and features:

Givi D1111ST Honda Tall windscreen kit
– Prone to cracking + Flexible
+ Cheaper – More expensive
– Uses original bolt holes + Aluminium rack
+ Adjustable using the original bolt holes – Needs modifications to change height
+ Doesn’t yellow overtime – Yellows
+ Scratch resistant – Scratches more easily
+ Wider – Narrow
– No vibration protection + Grommets to resist vibration damage
– Thin + Thicker windshield

Both have their pros and cons, but for me, the reason to buy a tall windscreen from Honda is the aluminium rack to add a GPS mount, and the more flexible windshield.

Polycarbonate windshields are more flexible than acrylic ones, and are also stronger, but not more rigid. To hold their form, they need to have a good bend in it to add some structural integrity.
Acrylic windshields on the other hand are UV and more scratch resistant than polycarbonate windhields. They do however shatter or crack on impact.

The Honda Tall windshield kit has a flaw, and that is that when mounting a windshield extension, it tends to bend in the wind. A solution for this is to add 2 spacers to the upper bolts, bending the windshield and adding structural integrity. However it is more durable than the Givi D1111ST.

Here’s a video of the Install and test ride with the Honda Tall Windschield.

Test ride:
There is a lot more different than just the wind protection.

Because of the wider opening on the bottom of the windshield, it makes a vacuum and removes almost all turbulence. It is however not “all away”. I used a windscreen extension to compare it to the Givi one, and it does feel better. (note: the givi windscreen is also tested with windscreen spoiler).

My findings are (for a guy of 5ft7, 1m72) it feels much better, AND I can reach higher speeds more easily without hiding behind the windshield.

The Honda windshield does wobble more at high speeds, but that isn’t such a big problem.

Final verdict:
I like how much difference in wind protection there is, even when the windshields almost have the same dimensions.

The aluminium rack on the Honda Tall Windscreen has the advantage of being more sturdy, but the Givi one has the advantage of being relatively cheaper compared to the original price of €140,-

The clear winner is the Honda Tall Windscreen with the rack, unbreakableness, rugged look, and the wind protection.


Review: Chinese adjustable clutch and brake levers

Some time in July, I ordered a set of levers for my Honda NC700X.
I chose to go the Chinese way again, because I’ve read more good stuff than bad stuff about those Chinese made levers, and my wallet also tells me I don’t need Pazzo or ASV levers.

Well I bought these on the 14th of July and received these the 7th of August. I’ve even made an install video about it which you can watch here:

Well to start: they are packaged very well. Bubble envelope, wrapped in foam, protected from dings and bangs in transit.

The fitment is also perfect, but the downside is that they don’t have steel bushings to pivot on.

The whole set is made from CNC’d aluminium that has been anodised.
I chose a titanium gray because that is a color that fades the least in direct sunlight.

The Chinese levers have a CNC textured grip surface, but they still feel a bit slippery. However, it is a nice touch and makes it look more expensive.

Capture.PNG
The back side of the levers

Features
This set only has an adjustability function, not being able to swivel up and down in case of a crash, but that actually doesn’t matter anyways because a set of these only costs €20 including shipping.

They can be adjusted 6 steps each using the small lever on the lever itself, and it keeps tension very well I must say because it never slipped out of it’s position.
Note: I also loctited the shit out of the bolts so they never come loose.

They come in many different colors and lever sizes, but I wasn’t sure if I wanted a shorty lever because I’ve never ridden with one before, and it still keeps the “OEM” look when you get the normal length levers.

Installing is easy, if you watch the video. Just loosen 2 bolts, remove the lever, insert the new lever and install the 2 bolts again.
The clutch side is a little bit harder because you have to loosen the barrel from the clutch lever.

Verdict
So now I’ve almost done 7000km on the new levers, and they still feel the same. They didn’t loosen over time, they didn’t bind over time. Just lube the levers up enough to keep it from wearing and rubbing. (even my handlebar muffs that give off a lot of lint didn’t even manage to bind the levers up)

They also look the part and make the bike look sportier too, and the finish of these things is immaculate.
The only downside to these is that they don’t have bushings to counteract wear, but with some grease and general maintaining, it shouldn’t be a problem after all.

If you are in the market for aftermarket levers: Skip Pazzo and ASV or any premium brand and buy china made levers. When you crash you just take out another set, or use the originals again, and go for the next round.

Review: Sena SR10

For almost a year I have a two way radio mounted on my bike to communicate with my dad when he’s riding behind me when we’re touring.

I tried to talk to him over the wired set, but it only transmitted muffled voice and wind noise. Even when I had my chin flap mounted.

He was sick of it and wanted me to buy a Sena SR10.
So I did when they were on stock again.

Our situation
– Bad voice quality
– Bike to car communication
– 1x Sena 3S
– Wired helmet communications

The solution was clear, the Sena SR10 will solve all these problems with wind noise, bike to car communication (this one still doesn’t exist as a standalone version) and it’s wireless!

Package contents
– Sena SR10
– PTT button
– PTT button extension cord (spiral)
– Aux cord (for when you use it with your phone/gps/mp3)
– USB and 12v car adapter
– Belt clip
– Handlebar mount kit

You still need a proprietary cable to connect your Sena SR10 to either iCom, Motorola single pin, Motorola dual pin, Yaesu, Midland and Kenwood two way radios.
These cost about 24€

I have an iCom and Motorola Single pin device. In the pic below you can see the iCom radio, because I still don’t have acquired a Motorola Single pin cable.

IMG_20170727_170051

So how does it do it?
It’s simple: Sena Magic!
For what I know, the PTT button will transmit when the SR10 is powered on, but no voice will come through if no headset is paired.
The SR10 should work with all bluetooth headsets, but with my Sena 3S I had to press the “+” button for 5 seconds to pair in “phone” mode instead of the intercom mode.

The cool thing is that the louder you set the volume on the radio, the louder it gets on the speaker.
Combined with Sena products, the sound quality is amazing, without wind noise! (as per my dad.)

Mounting on the bike/yourself
I have made a gadget rack that connects the whole “intercom array” to the bike using a rip off gopro mount. It works especially well.

IMG_20170727_183204
It’s much more easier to mount and remove the whole array than removing the SR10, intercom, cables and all that one by one.

You can also choose to use the belt clip or handlebar mount to attach it to your belt or handlebars.

Pros&cons
+ Universal pairing
+ Incredible sound transmission
+ Long stand by time
+ “Weatherproof”

– Rather expensive at 180€-200€
– Proprietary cables that cost 24€ extra
– Bit bulky

Final verdict
It’s Sena quality, so it should be all good and waterproof.
With the right radio, bike to car communications will be easier than calling.

I’ve never travelled longer than 7 hours straight, so I can’t know how long the Sena could do in stand-by and talk times, but that shouldn’t be a problem because you can charge it via a powerbank using a micro USB cable.

If you are a person that rides a motorbike and occasionally have a follow car and a two way radio set to spare, the Sena SR10 should be the solution to your problem!

Review: HELD Handlebar Muffs

It’s beginning to get colder, and that calls for drastic measures in the war against wind, rain and cold.

I’ve seen some people riding with handlebar muffs from Wunderlich, Givi, Tuscano etc… but they are too expensive for my taste. They should work well though, but I’m not planning on using it all the time, only in the winter.

Well it was time to get some, but the shop only had 2 Givi options, priced at around 50€. That was too expensive for me. They also had a set of muffs for scooters that was priced at about 20€. It was a bargian for that price!

They also had heated grips, but they cost around 50+€ per set, and you have to get a relay for it to switch it off when the bike is off too.

Ok, so I’ve bought the Held handlebar muffs, but the problem is they won’t fit over my Givi HP1111 handguards. So off with the handguards, and on with the handlebar muffs.

Modifying part 1:
The handlebar muffs slipped too much, and the velcro piece looked so weird when pulled over the mirrors. That’s when I began to poke holes in it to screw it to the bar ends and mirror. It won’t get stolen that way, and they are also much more stiff.

Testing part 1:
I went out and didn’t have cold hands, but the problem is that the muffs still collapse on the brake and clutch lever, pressing them in. At higher speeds (140+km/h), the clutch gets pulled so hard it begins to slip.
This is a dangerous situation and shouldn’t happen, but these muffs were made for scooters that travel sub 50km/h. Under this speed nothing much happens.

Modifying part 2:
Coming home, I remembered I still had some of that flower pot tray plastic laying around somewhere, and cut it in the form of a handguard so the handlebar muffs don’t collapse anymore. This was a major fail, because the flower pot tray plastic was too weak and bendy.

Since I didn’t give the handlebars away with the new owner of the XF, I still had them laying around and found good use for them. I cut them in half and fitted them inside the handlebar muffs. The plastic is thicker and sturdier than what I’ve originally planned with the tray. I could also feel a lot more room inside the handlebar muffs.

Testing part 2:
Hooray! It works! I can travel much faster without making the handlebar muffs collapse, and they work like a charm!

I also have more room inside, no fiddling around searching where all the buttons are etc.
Mission success!

General ideas and conclusion:
For about 20€, it’s the best purchase I’ve made for the bike to keep warm in the winter.
I don’t need grip heaters, heated gloves or anything of that overpriced BS.
It’s mostly function over form. My gloves don’t get wet in the rain, and my hands aren’t getting cold in the wind 🙂

Granted I had to modify some handguards that I already had to make it work perfectly, but they sure do look better than the Givi ones 🙂

The only problem I encountered was that they get wet when the bike is parked outside when it rains. Being impermeable it collects water inside too.

Here are some pictures of the installed handlebar muffs:


Review: BlackWidow Decat pipe for NC700X

I’ve been stalling this idea for a few months after I got the bike in April.
I wanted to install a Decat pipe (no catalytic converter), and even told you so in the video Honda NC700X – My Bike Modifications! (opens in new tab).

It was not that week that I bought it, but just last week on a Sunday.
So here’s my experience with researching, buying and installing the NC700X Blackwidow decat pipe.

Research!
As you may know, there aren’t a lot of manufacturers that produce decat pipes for the Honda NC700X/S.
Here is a very short list of those who make decat pipes, including links to purchase them:
1. Leovince
2. Arrow
3. Blackwidow

Since I’m a cheapskate, I went with the cheapest option, which is offcourse Blackwidow.
It’s a relatively new and unheard of exhaust manufacturer, which probably stocks exhausts for almost every make and model of bike there is.

I already found out that Blackwidow made a pipe for the NC, but no-one ever tried it out.
It made me feel quite sceptical about the site too.

dec
Blackwidow NC700 Decat pipe

The one thing that pushed me over the barrier to purchase it was Premises187. He had made a video about the install of the Blackwidow Decat pipe for his NC700, and the sound that you hear in his video doesn’t justify the sheer goodness of the full system.

Buying!
So now I was primed to buy one, but since I live in Belgium, and the pipe has to be bought in the UK, I had to pay conversion fees. It still was cheaper than expected. I saved about 24 cents on this purchase.

You can only pay with creditcard or PayPal on the Blackwidow site. I had a Maestro card, but that one needed a CVC code, which I didn’t have. So I pulled out my prepaid CC, load charged it up and paid for the decat pipe.

The processing took about 1 day. Then it got shipped by DPD
I ordered it on Sunday and got it on Wednesday before noon.

Unboxing!

The decat came in a cardboard box, but it was so light I thought it was empty.
In the box there is:
– Pipe (front piece)
– Pipe (rear piece)
– Assembly putty/gun gum
– Keychain & merchandise (stickers)
– Manual and invoice

Blackwidow box

The pipes are packaged in plastic, with bubble wrap and Blackwidow tape around it, so It’s protected from dings and bangs.

Installation!
Install was quite easy, because I watched Premises’ install video.
However, I did have some problems concerning the fit of the pipe.
The pipe is a bit off, so my Ixil muffler sat askew in the bracket. Other than that, the fitment is perfect.
Don’t forget to remove the ground cable from the exhaust hanger first, because if you don’t you’ll risk damaging it.

Sound!
You have to hear it in person to hear the sheer loudness, raspyness, deep sounding roar that the NC now produces. It’s a big difference if you ask me.
I didn’t change the airfilter to K&N because Premises didn’t too.

However, you need to reset the ECU or you risk running too lean, doing damage to the bike in the long run.

I have made a video about the pipe here:

Review: Sony HDR AS-300V

Well since I wanted to get some voice and better sound in my videos, I sold my Tascam DR-05 and bought a new Sony HDR AS-300V action camera to get better battery life and a mic input.

The main reason I didn’t bought a same priced GoPro Hero 5 session is because it requires a 50+ euro converter to add a 3.5mm microphone jack.

Packaging:
This time it doesn’t come in a package with a display case as the AZ-1. It comes in an all cardboard box with a plastic front, but who needs the packaging anyway? It’s what comes in the package that counts! 🙂

IMG_20170718_122441
Left: AZ-1VR, Right: AS300V

Package contents:
The package contains the following items:
– Sony HDR AS-300
– Underwater housing (MPK-UWH1)
– NP BX-1 Battery pack
– Sony RM-LVR3 LiveView Remote
– Wrist strap for RM-LVR3
– Charger + charger cable for RM-LVR3
– Cradle with tripod mount for RM-LVR3
– 1 set of 1 curved sticky back mount + tripod screw hole mount

IMG_20170718_124510

Size comparison:
The Sony AS300 has a size (lxbxh, including waterproof case) of 9cm x 4,7cm x 7cm.
Without the case it is 8,5cm x 3cm x 5cm.
The AZ1 is much smaller with a size (including case) comparable to the AS300V without a Case.

Price:
I got this action camera for about 300€, which is almost the same as my AZ1VR that I bought a year ago.
A lot of bang for the buck if you ask me.
You can buy it here: Sony HDR AS300V on Amazon

Specifications:
– Zeiss Tessar lens
– 1/2.5 (7.20mm) back illuminated Exmor R CMOS sensor
– Waterproof up to 60m with underwater housing (without it’s just splashproof)
– Micro HDMI, Stereo mic jack, Micro USB terminal
– Compatible with M2 and Micro SD cards (SDHC/SDXC)
Full specs here: Sony AS300V

Pros & Cons:
Well to start, it is a fairly cheap action cam for the price. Comparable GoPro’s are no way near the quality of the HDR AS300. The only problem is that these cameras are most likely side mounted because of the form factor. Though not a problem, some motovloggers do like to use a “chin mounted” view.

What I really like is the extended battery life. It shows how much time you have left till your SD card is full or the battery is empty.
It shows I can still record for 2 hours and 47 minutes, but in reality (specs from Sony) it shows that it can only record for about 135 minutes on 30fps.
I film every piece in 60FPS.

A con is that the OIS (SteadyShot) is a bit too much. It makes your riding and actions look much more slower than they are. I prefer to keep the SteadyShot off.

The camera also sports a tripod hole, which is extremely convenient because there isn’t a special mount needed unlike by the AZ1VR, not to forget the AS300 also has a 3.5mm mic jack, which makes it possible to get an all in one vlogging setup without any converters.

To be fair, I’m really happy with this purchase, and I recommend this camera to everyone who needs a fairly compact action camera that sports a lot of features.

Here’s an example clip with audio from the Philips LFH91740 plugged into the HDR AS300V

Review: DR. Wack S100 White Chain Lube

Because I have a new to me bike, I’d like to invest a bit more in the products I use to keep my bike maintained.

In the past I’ve used Holts Chain grease (green, sticky stuff), Holts Spray grease, Nigrin Kettensprühfett -für Motorräder- and now S100 White Chain Lube.

I’ve had my doubts about the S100 spray grease, but I was pleasantly suprised.

It sprays well, it sticks very good, there is almost no grease on the wheel or on the chain guard.

Looking at the specsheet it contains the following elements:
– 20<25% Butane CAS 106-97-8
– 25-50% Naphta (petroleum), hydrotreated light CAS 64742-49-0
– 20<25% Propane CAS 74-98-6
– 1-<2,5% 2-Ethylhexyl-zinkdithiophosphate CAS 4259-15-8

It comes to my mind that the last element is an additive that hardens under pressure, and thus increases the life of the chain. Not a lot of chain sprays I’ve seen and used have that additive. Maybe it is why the S100 Chain spray won the motorrad online test.

So what is my experience with this chain spray?
I have bought a small bottle (75ml) of S100 to keep in my bike to lube the chain when necessary.

It smells a lot, so lube the chain in a well ventilated area, perhaps outside.
You also have to fully depress the spray nozzle to get the maximum amount of lubrication on the inside of the chain.

NEVER spray on the outside of the chain, because that doesn’t do anything but wasting your precious spray.

Also make sure you don’t have any overspray on your tire. That results in crashing the bike. Better is to use some cardboard to protect the ground and tire from overspray.

The best time to lube the chain is after a ride. That way, the chain is warm/hot and absorbs the lube much more between the X/O/Z rings.

I highly recommend S100 Chain spray to everyone who loves to ride their bike, and doesn’t want to clean the slung off chain spray everytime they ride their bike 🙂

I R8 8/8 GR8 M8

Review: Ixil Hyperlow XL

As almost everyone knows, stock exhaust systems never sound good on bikes, especially for commuters.

As an old saying (and also controversial saying): Loud pipes save lives.
This is partially true. I never get noticed by cagers unless I have a loud as f*ck exhaust on my bike.
Never had problems with an exhaust that is too loud, they always hear me coming from a mile away.

Now, the original exhaust (muffler) on the NC700X is so silent, that a cooling fan from a car makes more noise. I thus bought a second hand Ixil Hyperlow XL.

Ixil Hyperlow XL

The seller (and also my motorcycle dealer) wanted to have 250€ for it, which was way to high since it was also second hand.
I paid 170€ for the Ixil and cleaned it up some more, and it’s shiny again.

Sound:
The sewing machine sound is gone, and when I start the bike, it gives a nice low growl. When increasing the RPM (going at speed) the bike sounds a lot better.
Keep in mind that I ride without the dB-killers, because it is silent enough to ride without, but still loud enough to keep getting noticed by cagers.

Look:
I really like the look of the Ixil pipe, it reminds me of the Hurric Pro 2, but it looks more sporty.
It definitly makes the bike look good, but I’m a bit worried that water droplets get into the pipe when it rains and the engine is off.

Fit:
You need spacers to get the Hyperlow on the right place. Fitting the muffler onto the header pipe was a bit difficult. But it fits nicely. There’s also a center stand buffer on the pipe present.

Performance:
There is no noticable performance increase, because the catalytic converter still obstructs the flow. A decat header pipe and air filter should work.

Problems:
– Water can get into the exhaust when parked in the rain
– Centerstand buffer is too weak and bends on impact

Here’s a video of the sound recorded with the Tascam DR-05 V2

Review: Givi HP1111 Handguards for Honda NC700X

I like the look of riding without handguards, but the weather just doesn’t get better, and it even started hailing in April!
I thus impulse bought some Givi HP1111 handguards that will fit my Honda NC700X.

Having a windscreen also from Givi (D1111ST), I looked up if they fit, and they did.

Fitment:
The fitment is so precise that it has around 1cm (and less) space between handguard and windscreen.
The handguards mount to the bar ends and mirrors. You can still use the original bar ends.
The other side mounts to the mirrors using a metal bracket and some washers.

Installation
I struggled with the install because there were no instructions, only numbered parts and an exploded view, but it is possible to do it only with the exploded view.
There are also a lot of different parts, which is totally unneccesary and can be made much simpeler when combining 3 different parts into 1.
There is also a third bracket for the DCT version marked with an “A”.

Protection
The Givi HP1111 handguards are mostly to use for wind protection and not for branches or trees. They do have an aerodynamic design, but they don’t wrap around the controls.
I hope I don’t have to make some handguard extensions just like with my old handguards :’)

Cost vs performance
I hope a lot of R&D went into making these handguards, because 100€ for 2 pieces of plastic and some miscellaneous hardware is to my taste a bit overpriced, but I’m happy these fit in combination with my Givi windscreen.

Pros:
– Keeps some wind from your hands, but not all of it
– Protects the levers a bit
– Fits perfectly in combination with other Givi accessories

Cons:
– Expensive (but they are cheaper than barkbusters and Touratech stuff)
– Unclear instructions
– Too much hardware
– Isn’t sturdy enough

A few pictures

This slideshow requires JavaScript.