Lanesplitting safe or not?

When communting to work/school, traffic can be bad when it’s rush hour.
I cut through traffic like a hot knife through butter within the traffic jams.
Now there are some people who say that lanesplitting is dangerous, and they’re not wrong.

There are some unwritten rules that you should know when filtering/lane-split.
1) If you can’t fit, through the gap or are not sure, then don’t go.
2) When lanesplitting, don’t be mad if there’s a slower motorcycle, just flash your lights.
3) Same as rule 2, when you are the slower bike, make way for faster bikes.
4) DO NOT (NEVER) CLOSE MIRRORS TO LANESPLIT! If the guy doesn’t want you to pass, look for another way.
5) Don’t hit anything(!) on your lanesplitting adventure

Okay, now that that’s cleared up, we can talk about the dangers of lane splitting.

Some people say lane splitting is dangerous, and they’re not wrong.
Here are some disadvantages:
1) People could swerve into you and possibly throw you off your bike
2) You can run into people that are jaywalking (but that’s their own fault)
3) You need good balance and a lot of anticipation

Now there are a lot more advantages when you lanesplit, these are the following:
1) You shouldn’t be able to get hit from behind.
2) You improve traffic flow.
3) You are getting to your destination a lot faster (so you can be on time)
4) Using an air cooled engine, you can keep your engine cool.
5) Improves fuel efficiency and is better for the environment.
6) You don’t breathe in the exhaust gasses from other cars (well yeah, less of it)
7) Just feels so good to go faster than other traffic!

My opinion on this is that lanesplitting should be legal anywhere because motorcyclists are also vulnrerable road users and deserve it to feel and be safe anywhere on the road.

Here’s a video of me filtering and lanesplitting through traffic.

Thank you for reading this post, and remember, ride safe and ATGATT!


Review: Tascam DR-05 V2 & AK-DR11G

I’ve just bought the Tascam DR-05 V2 sound recorder to improve engine sound quality while riding my bike, so the sound will be a lot better in the upcoming videos.

Reason why I’ve bought the Tascam DR-05 V2 and not the Zoom H1 is maily because of the price.
The Tascam costs me 129€ including the accessory kit while the Zoom H1 costs 10€ extra and has some problems regarding the battery cover.
The Tascam also has a better finish than the Zoom.
Also, using the onboard Sony microphone, there isn’t a lot of engine sound, except when I’m riding under 30km/h.

Packaging:
Seems decent, A lot of information on the box itself. Not a blister, so it’s actually a semi-professional recorder.
The Tascam DR-05 is packaged with a styrofoam wrapping.

Initial thoughts:
The Tascam DR-05 looks and feels like a decent, well built, quality piece of equipment.
It’s fairly easy to navigate through all the different menus, and there are even some functions I don’t even use.


Accessories:
In the box you get:
– 2x AA batteries
– Mico SDHC 4GB Class 10 card (already in the recorder)
– USB cable
– Multilingual instruction manual
– Guarantee card

I also have bought the AK-DR11G accessory kit, which includes the AC adapter, windscreen, grip and carrying case.

The accessory kit is also compatible with the DR-40 and DR-07MKII

Implementation:
The recorder is “mounted” between 2 pieces of foam, cut from an old foam pillow. Then, I’ve put the recorder in between, making sure the microphones are sticking out on top.
Just make sure that you’ve taped up the battery cover, it can come loose when removing the DR-05 from the foam.
As an extra, I’ve installed the windscreen/mircophone muffler on top to lessen the wind noise.

I sync my audio to the video using the good old program “Windows Movie Maker”.
It’s easier and much faster than using Adobe Premiere CC or Sony Vegas Pro.

The audio is still not perfect, but I’m working on some settings.

Verdict:
It’s relativly cheap compared to the Zoom H1, considering the build quality and the form factor. Upon looking at a comparison between the DR-05 and the H1, there wasn’t much of a difference between both of the devices based on sound quality.

Sample video:

Review: Hans Bo CREE U5 LED spots

When my old daytime running lights (that costed me about €1,50,-) broke when the cables came loose from the housing, I was thinking about buying some cheap aux lights.

I came up on the video from CagerOnTwoWheels (Cheap Aux Lights!) and they seemed interesting, although I wanted to buy some that didn’t have the 3 modes on it.

I went to search online for the CREE U5 led’s, which are ofcourse made in China.
Being a fan of buying things on AliExpress, I quickly became overwhelmed with these U5 style LED’s.

After searching for a while, I’ve seen that the Hans Bo type is a bestseller on AliExpress,
so I ordered a set of two.
Here’s a link for anyone who wants to buy these: Hans Bo CREE U5 125W (They have 3 modes!)

They were delivered at my doorstep in about 5-6 days, which is incredibly fast for Chinese products.

Package contents:
– 2 Aux Lights
– 2 switches
– Mounting hardware
– 2 allen/hex keys.

Installing was easy using this schematic.
DLR ACC schakel


After installing, I’ve seen that the lights aren’t in the same mode, which justifies the need of 2 switches. One was also not working, so I’ve sent a message to the seller.

It took 2 days till I got the message that they are going to send a new one!
That’s what I call customer service.

I’ve recently received my replacement LED light within 10 days, and this is the result:

This slideshow requires JavaScript.

The lights have a “Cold White” color, which in fact look a bit cheap, but should be more noticable on the road.
I couldn’t find the secondary switch to regulate both lights, but they are now in phase with eachother.

I’m quite happy with the results considering the low price of just under 24€ or for the US readers out there 26USD.

Don’t bother removing the 3 modes using the U2 chip removal, this just makes the light unusable. Just buy a “High-Beam Only” light.

Anyways, thanks for reading this post.
If you have questions, just ask!


Farkels, and why I have them

Any motorcyclist considered once in their lifetime that they need some upgrades to their bike. Well, I’m one of those motorcyclists.

For beginners:
Farkels (or farkles) are mods that are made to your bike to improve looks or the comfort of your bike. Farkels (or farkles) may not come as standard equipment on your bike.
This equipment has to be functional, hence the name “Farkles” (“-arkles” is from the word “sparkles”). If it’s chromed, it isn’t a farkel or farkle, it’s considered “Bling”.
Some examples are: radar detector, GPS, heated grips, more comfortable seat etc…

When I bought my bike, there were already some farkels (or farkles) present.
These were: A Kappa topcase, and a bigger windscreen.These farkels were pretty handy, because I can’t fit my tools under the seat, and in the winter months, ice cold air blasting in your face isn’t relaxing either.
There’s also a first aid kit in my topcase, but my helmet doesn’t fit in it anymore.

After a few months, when winter came, I bought some handguards, which were a clone of the Acerbis Rally guards. These came in handy because of the wind chill I get.
With my first lowsider on the bike, one of the bar weights broke off, which also broke the mounting hardware of the handguard. Some washers and a longer bolt fixed this.

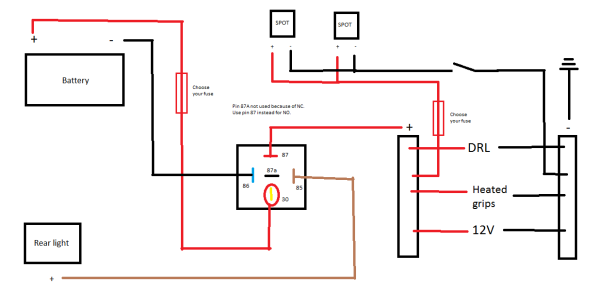
I also needed a 12 volt outlet, which is always on, so I can charge my phone when the bike is off. I normally carry an air compressor around in the topcase that works on 12v, so I can inflate my tires when necessary.

Since my exhaust muffler was too quiet, and also too heavy, I’ve bought an M.S.R. Classic Inox muffler to replace the heavy, good for nothing, OEM muffler.

Having almost no money to buy a GPS for my bike, I was looking at some waterproof cellphone holders. I got online, and purchased a chinese made cellphone holder for about 5€. Does the job well, but since I have a new phone, I’ve bought a bigger one.

Almost half a year passed and I was getting fed up with the noise the bigger windscreen gave. Looking for some laminar lips, I found one from Givi, which was way too expensive for what it does, but I’ve never tested it.
After searching some more, I found an exact copy of the Givi windscreen spoiler, which was exactly the same quality, just without the “Givi” logo.
I paid about 30€ for it. That’s not a lot of money compared to the more *ahem, expensive Givi one.

I was also afraid that my handlebar would bend when in a crash, so I’ve bought a crossbar.
The crossbar is fully adjustable, and best of all, I can mount my cellphone holder to it.

As of above, I was afraid of crashing and also bending my gear shift lever into my crankcase, which will make the bike a total-loss, because reparation will cost more than the bike has cost me. I’ve put a diy case-saver on the bike, which will protect the case against sharp objects, such as the gear shift lever.

Almost a year had passed, and it was ice cold again. Winter has come.
My old winter gloves weren’t in the best shape anymore, but luckely, I have some new ones from last year. Though the new gloves didn’t stand up at the low temperatures the winter gave. This is the time of the year that heated grips are bought.
I bought some heated grips at my local motorcycle accessory store. The grips only have 2 settings: High and low. High is too hot, and low is too cold, but luckely, I only use it in winter times, or rain. They feel very comfortable.

I then searched for some crashbars and an optional pannier rack.
A crash bar was at the top of my list, but because the one I found was so ugly, I was stalling this till I found a better one. After scrolling at some pictures of other Freewinds on Instagram, I came across a picture from a Polish guy (Kamil.luxmot.pl), and he had a very nice picture of his Freewind with a crashbar that I’ve never seen before.
I asked him what make the crashbar is, and he told me he got it of Moto-adventure-tech.com.pl.
I then looked at the site, and saw the prices were in PLN, converted to EUR, his prices were cheap, so I bought the whole package.
A full crashbar and pannier rack. (Read the review here)

Since I have a pannier rack, why not buy some panniers?
I received a gift card as a compensation of my drenched boots (that were guaranteed waterproof) and bought some nice givi E22 panniers.
And since I have a crashbar, why not order some auxiliary lights?
Off to “the great net of inter”!
I ordered some “Hans Bo” lights. Chinese made, but good quality. You’ll read that in a review later on.
I mounted them a few weeks ago, but one is broken, so I have to wait for a replacement, which is totally FREE!

After all, I don’t want to know how much money I’ve spent on my bike, because it’s almost more than the bike has cost me. But still, farkels (or farkles) are there to improve how you experience your motorcycle.
I’m still not finished farkling up my bike, more reviews can follow.

Here’s a list of all the Farkels (or farkles) I have on my bike:
Some weren’t mentioned.
———————-
Bigger windscreen
Topcase
Heated grips
Crashbars
Pannier rack
Aux lights
12V socket
Givi E22 Panniers
Digital clock
Handguards
Windscreen spoiler
Case saver
MSR Classic Inox Muffler
Handlebar crossbar
Cellphone mount
Smaller indicators
Wheel striping
———————-


Review: Sena 3S

Long trips going to school and back home were a bit boring, so I wanted some music on the road, so I’ve bought a Sena 3S Bluetooth headset for my helmet.

Prior to the Sena 3S, I had a waterproof mp3-player and some helmet speakers (which were too expensive for what they were). Did the job well, but not good enough.

I was looking for the cheapest, well known brand for motorcycle intercom systems, and I came to conclusion that Sena had some interesting communicators.

Since I almost don’t ride with friends (because my friends aren’t bikers), it had to be an intercom with the least functions, so no radio with RDS.
I also didn’t like the view of a communication device on the side of my helmet, so there was only 1 left.

The Sena 3S.

The Sena 3S has 3 different versions:
– Open face helmets
– Full face helmets
– Modular helmets

I have the version for open face helmets, because the modular one didn’t exist at the time that I bought the 3S.

Mounting the Sena 3S is easy. There were some cutouts in my helmet to install speakers.
The speakers are both 11mm thick, but it’ll fit just right. Reason why is that the electronics are mounted inside the speakers.

Some specs:
– Bluetooth 3.0
– 200 metres intercom (didn’t test that)
– Dual bluetooth (using 2 bluetooth devices at the same time, also didn’t test that)
– stand by about 7 days, 8 hours talk time, charge with micro-usb.
– Max. 1 connection with other Sena devices (didn’t test that either)

Tests I’ve done:
– Calling: Voice is clear, both for sender and receiver, also has a “Hello” function.
– Music: Not a lot of bass, more difficult to listen to at higher speeds.
– Pressing buttons with winter gloves: Passed, just a bit fiddly.

Package contents:
– Sena 3S
– Micro USB cable
– 2 microphone foams
– Manual

Drawbacks:
– It doesn’t fit every helmet, when buying one for a modular helmet, just buy the modular helmet version.
– It sometimes loses connection, but can also be the phones fault
– Long charging times
– Not waterproof

In a nutshell, I’m very content with this intercom. The quality is good, and it isn’t bulky.